DevOps guide
The DevOps guide is designed to help you deploy and maintain your Corteza instance. The guide provides enough out of the box working examples to get you up and running.
|
This page provides all of the information to run your Corteza using our prebuilt docker images. If you need additional information regarding specific topics, refer to the DevOps guide sub-sections. |
|
Corteza is compiled, developed, and tested for modern browsers. If you need to support older browsers, such as InternetExplorer, you will need to build your images. Refer to System requirements for more details. |
Architecture and repository overview
|
DevNote update diagram; rewrite to PlantUML. |
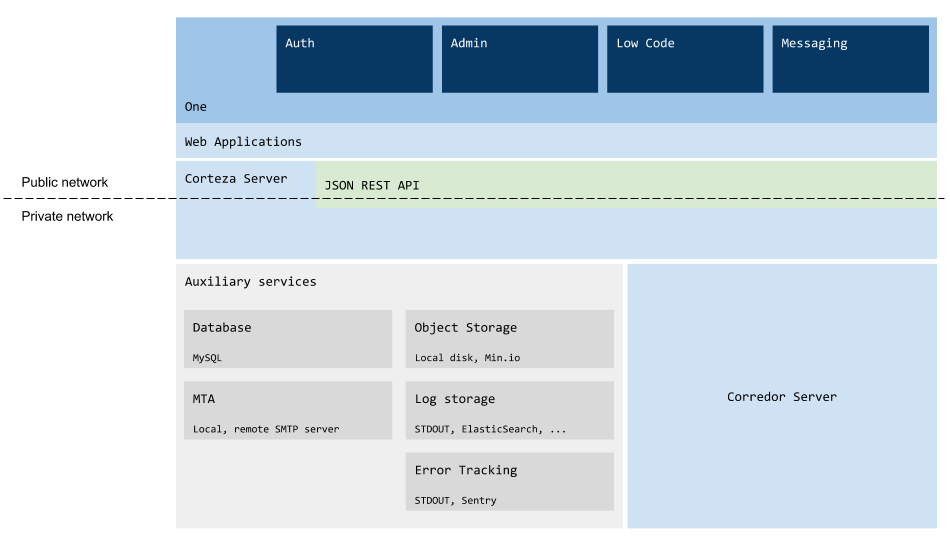
corteza-webapp-* repositories:The web applications communicate with our back-end system (Corteza server) which further interacts with the automation script runner (Corteza Corredor server) and various auxiliary services primarily provided by external services/projects.
-
data federation,
-
data storage,
-
logger,
-
email sender.
System configuration
Corteza is configured via the environment (.env) file.
It allows you to quickly deploy and configure how Corteza should behave on another system.
Our examples are configured to work as is, but feel free to tweak the server and the Corredor server as you see fit.
|
The |
The .env file performs implicit Docker Compose configuration, variable substitution for Docker configurations, and service configurations.
You can use variables defined in the .env file inside your docker-compose.yaml files using ${VARIABLE_HERE}.
Deploy offline
|
DevNote provide a quick rundown of what each deploy config enables you to do; automation scripts, workflows, persistent storage, … |
Offline setups run all services on the same network where the ports are bound to the host’s network. This section provides a minimum setup with MySQL as the persistent database storage with Corredor server enabled.
See for additional offline deployment configurations.
|
Offline deployments are suitable only for local development and demos (environments that are not accessible from the outside). |
Setup your file structure
📁 my-corteza
  📄 .env
  📄 docker-compose.yaml
  📁 data (1)
    📁 server (2)
📁 db (3)| 1 | Make sure to change the owner to the Docker container (you can use chown 1001:1001 data/db and chown 4242:4242 data/server).
Omit if you won’t use persistent storage. |
| 2 | Here is where all of the server data is stored, such as uploaded attachments. |
| 3 | Here is where the database data is stored. |
Configure docker-compose.yaml
version: '3.5'

services:
  server:
    image: cortezaproject/corteza-server:${VERSION}
    restart: on-failure
    env_file: [ .env ]
    depends_on: [ db ]
    ports: [ "127.0.0.1:18080:80" ]

  db:
    # MySQL Database
    # See https://hub.docker.com/r/percona/percona-server for details
    image: percona:8.0
    restart: on-failure
    environment:
      MYSQL_DATABASE: dbname
      MYSQL_USER:     dbuser
      MYSQL_PASSWORD: dbpass
      # get the random generated password by running: docker-compose logs db | grep "GENERATED ROOT PASSWORD"
      MYSQL_RANDOM_ROOT_PASSWORD: random
    healthcheck: { test: ["CMD", "mysqladmin" ,"ping", "-h", "localhost"], timeout: 20s, retries: 10 }
Configure .env
########################################################################################################################
# docker-compose supports environment variable interpolation/substitution in compose configuration file
# (more info: https://docs.docker.com/compose/environment-variables)

########################################################################################################################
# General settings
DOMAIN=local.cortezaproject.org:18080
VERSION=2021.3

########################################################################################################################
# Database connection
DB_DSN=dbuser:dbpass@tcp(db:3306)/dbname?collation=utf8mb4_general_ci

########################################################################################################################
# Server settings

# Running all-in-one and serving web applications directly from server container
HTTP_WEBAPP_ENABLED=true

# Disabled, we do not need detailed persistent logging of actions in local env
ACTIONLOG_ENABLED=false

########################################################################################################################
# SMTP (mail sending) settings

# Point this to your local or external SMTP server if you want to send emails.
# In most cases, Corteza can detect that SMTP is disabled and skips over sending emails without an error
#SMTP_HOST=smtp-server.example.tld:587
#SMTP_USER=postmaster@smtp-server.example.tld
#SMTP_PASS=this-is-your-smtp-password
#SMTP_FROM='"Demo" <info@your-demo.example.tld>'
Run the services
In the root of your project (next to your docker-compose.yaml and .env files), run the docker compose (the execution can take a few seconds).
The command (downloads and) runs all of the services configured in your docker-compose.yaml file.
docker-compose up -dCheck if everything started correctly by running docker-compose ps.
The output should look like this:
      Name                    Command                   State                      Ports
-------------------------------------------------------------------------------------------------------
demo_mysql_db_1         /docker-entrypoint.sh mysqld     Up (healthy)     3306/tcp, 33060/tcp
demo_mysql_server_1     bin/server serve-api             Up (healthy)     127.0.0.1:18080->80/tcp
See Troubleshooting if something went wrong/failed to start.
Test the deploy
-
Direct your browser to http://localhost:18080 (change the port if you used a different port). You will be redirected to the authentication page (
/auth). -
Create your account through the sign-up form (the first created account is an administrator by default).
-
Check the server version http://localhost:18080/version
-
Check the server’s health http://localhost:18080/healthcheck
-
Check the API documentation http://localhost:18080/api/docs/
|
If you did not configure your SMTP settings, all sign-ups are marked as confirmed. |
Deploy online
Online setups separate your services into two networks; internal and proxy. The internal network hides most of the system from the internet. This section provides a minimum setup with MySQL as the persistent database storage with Corredor server enabled.
See for additional online deployment configurations.
|
You can use the same steps to configure multiple online deployments, such as a staging and a production environment. |
Setup your file structure
📁 my-proxy (1)
  📄 docker-compose.yaml
  📄 custom.conf (2)
📁 my-corteza
  📄 .env
  📄 docker-compose.yaml
  📁 data (3)
    📁 server (4)
📁 db (5)| 1 | Omit this if you’re not planning on using Nginx reverse proxy or if it’s already setup. |
| 2 | custom.conf must be placed next to the docker-compose.yaml file. |
| 3 | Make sure to change the owner to the Docker container (you can use chown 1001:1001 data/db and chown 4242:4242 data/server).
Omit if you won’t use persistent storage. |
| 4 | Here is where all of the server stuff is stored, such as uploaded attachments. |
| 5 | Here is where the database can store the data. |
Setup your Nginx reverse proxy
⚠️ We are inside the my-proxy directory.
This part automates the creation and renewal of Let’s Encrypt TLS certificates, forward traffic to Docker containers, and simplifies complicated firewall configurations.
|
The following instructions assume that you don’t have anything similar setup in your current environment. If you are using other means of providing traffic forwarding or SSL certificate handling, proceed with caution. |
We will be using Nginx Proxy and LetsEncrypt Nginx Proxy Companion. If you wish to use or are using something else, feel free to skip this section.
docker-compose.yaml should look like this:version: '3.5'
services:
nginx-proxy:
image: jwilder/nginx-proxy
container_name: nginx-proxy
restart: always
networks:
- proxy
ports:
- "80:80"
- "443:443"
labels:
- "com.github.jrcs.letsencrypt_nginx_proxy_companion.nginx_proxy"
volumes:
- ./certs:/etc/nginx/certs
- ./htpasswd:/etc/nginx/htpasswd
- ./vhost.d:/etc/nginx/vhost.d
- ./html:/usr/share/nginx/html
- ./custom.conf:/etc/nginx/conf.d/custom.conf:ro
- /var/run/docker.sock:/tmp/docker.sock:ro
nginx-letsencrypt:
image: jrcs/letsencrypt-nginx-proxy-companion
container_name: nginx-letsencrypt
restart: always
depends_on:
- nginx-proxy
volumes:
- ./certs:/etc/nginx/certs
- ./vhost.d:/etc/nginx/vhost.d
- ./html:/usr/share/nginx/html
- /var/run/docker.sock:/var/run/docker.sock:ro
# Create network if it does not exist
networks: { proxy: { name: proxy } }custom.conf should look like this:# Make sure we can upload at least 200Mb files
client_max_body_size 200M;
# Add other custom configs.
#Inside your my-proxy directory, run docker-compose up -d (the execution can take a few seconds) to start the reverse proxy.
Check if everything started correctly by running docker-compose ps.
The output should look like this:
      Name                     Command               State                    Ports
-----------------------------------------------------------------------------------------------------
nginx-letsencrypt   /bin/bash /app/entrypoint. ...   Up
nginx-proxy         /app/docker-entrypoint.sh  ...   Up      0.0.0.0:443->443/tcp, 0.0.0.0:80->80/tcp
Configure docker-compose.yaml
⚠️ We are inside the my-corteza directory.
|
Containers must be on the same network as |
version: '3.5'

services:
  server:
    image: cortezaproject/corteza-server:${VERSION}
    restart: on-failure
    env_file: [ .env ]
    depends_on: [ db ]
    networks: [ proxy, internal ]
    # Uncomment to use local fs for data persistence
    volumes: [ "./data/server:/data" ]
    environment:
      # This two are needed only if you are using NginX Lets-Encrypt companion
      # (see docs.cortezaproject.org for details)
      # VIRTUAL_HOST helps NginX proxy route traffic for specific virtual host to this container
      VIRTUAL_HOST:     ${DOMAIN}
      # LETSENCRYPT_HOST helps NginX LE companion pull and configure SSL certificates for your domain
      LETSENCRYPT_HOST: ${DOMAIN}

  db:
    # MySQL Database
    # See https://hub.docker.com/r/percona/percona-server for details
    image: percona:8.0
    restart: on-failure
    volumes: [ "./data/db:/var/lib/mysql" ]
    environment:
      MYSQL_DATABASE: dbname
      MYSQL_USER:     dbuser
      MYSQL_PASSWORD: dbpass
      # get the random generated password by running: docker-compose logs db | grep "GENERATED ROOT PASSWORD"
      MYSQL_RANDOM_ROOT_PASSWORD: random
    healthcheck: { test: ["CMD", "mysqladmin" ,"ping", "-h", "localhost"], timeout: 20s, retries: 10 }
    networks: [ internal ]

networks:
  internal: {}
  proxy: { external: true }
Configure .env
⚠️ We are inside the my-corteza directory.
########################################################################################################################
# docker-compose supports environment variable interpolation/substitution in compose configuration file
# (more info: https://docs.docker.com/compose/environment-variables)

########################################################################################################################
# General settings
DOMAIN=your-demo.example.tld
VERSION=2021.3

########################################################################################################################
# Database connection

DB_DSN=dbuser:dbpass@tcp(db:3306)/dbname?collation=utf8mb4_general_ci

########################################################################################################################
# Server settings

# Serve Corteza webapps alongside API
HTTP_WEBAPP_ENABLED=true

# Send action log to container logs as well
# ACTIONLOG_DEBUG=true

# Uncomment for extra debug info if something goes wrong
# LOG_LEVEL=debug

# Use nicer and colorful log instead of JSON
# LOG_DEBUG=true

########################################################################################################################
# Authentication

# Secret to use for JWT token
# Make sure you change it (>30 random characters) if
# you expose your deployment to outside traffic
# AUTH_JWT_SECRET=this-is-only-for-demo-purpose--make-sure-you-change-it-for-production

########################################################################################################################
# SMTP (mail sending) settings

# Point this to your local or external SMTP server if you want to send emails.
# In most cases, Corteza can detect that SMTP is disabled and skips over sending emails without an error
#SMTP_HOST=smtp-server.example.tld:587
#SMTP_USER=postmaster@smtp-server.example.tld
#SMTP_PASS=this-is-your-smtp-password
#SMTP_FROM='"Demo" <info@your-demo.example.tld>'
Run the services
Inside your my-corteza directory (next to your docker-compose.yaml and .env files), run the docker compose (the execution can take a few seconds).
The command (downloads and) runs all of the services configured in your docker-compose.yaml file.
docker-compose up -dCheck if everything started correctly by running docker-compose ps.
The output should look like this:
        Name                              Command                  State              Ports
----------------------------------------------------------------------------------------------------
my_production_demo_db_1         /docker-entrypoint.sh mysqld     Up (healthy)   3306/tcp, 33060/tcp
my_production_demo_server_1     /bin/corteza-server serve-api    Up (healthy)   80/tcp
See Troubleshooting if something went wrong/failed to start.
Test the deploy
-
Direct your browser to
http://your-demo.example.tld. You will be redirected to the authentication page (/auth). -
Create your account through the sign-up form (the first created account is an administrator by default).
-
Check the server version http://your-demo.example.tld/version
-
Check the server’s health http://your-demo.example.tld/healthcheck
-
Check the API documentation http://your-demo.example.tld/api/docs/