SAML
To enable SAML authentication, you need to exchange credentials from your identity provider (IdP in the following text). The configuration process involves the optional key generation and setting up IdP in the Admin panel.
Generating Private and Public Key Pair
|
The example credentials displayed in this document should not be used in your instances. |
|
This step is optional. You can use your existing key pair to set up SAML. |
openssl req -x509 -sha256 -nodes -days 365 -newkey rsa:2048 \
  -keyout private.key \
  -out certificate.crt \
  -subj "/CN=corteza.your-server.com" (1)

openssl rsa -in private.key -out private-rsa.key (2)

cat certificate.crt private-rsa.key (3)| 1 | The command generates a new key pair. |
| 2 | The command converts the private key to RSA format. |
| 3 | The command prints out the relevant keys you can copy. |
|
The example credentials displayed in this document should not be used in your instances. |
-----BEGIN CERTIFICATE-----
MIICwDCCAagCCQDbTNd4i3X/4zANBgkqhkiG9w0BAQsFADAiMSAwHgYDVQQDDBdj
b3J0ZXphLnlvdXItc2VydmVyLmNvbTAeFw0yMTEwMDIwNzAwNDVaFw0yMjEwMDIw
NzAwNDVaMCIxIDAeBgNVBAMMF2NvcnRlemEueW91ci1zZXJ2ZXIuY29tMIIBIjAN
BgkqhkiG9w0BAQEFAAOCAQ8AMIIBCgKCAQEAzb6QFbaa0IOpso8ZyhhWW6P2nwDn
N08LTFtHvRl0y0rspz2/PX5DSkUV+4I5Q2La21BZ8WAm28Ttr3BuUVQsnfDzPbSo
FSdgZYXcJXxeuaumwwtxpHpayvZj8zs0hyaie3diEMX7uqpGs/dL0pCTNmaI8nMo
LMjqJnYlQCz/HAUC5wrQHflfbLy8LA6KpCJuuTrFZGaMSIhW74HCYyp+2jTc6G1N
pxwBnwEqMy4RrYi5Mgn3GCPxo2LnSq3SVIurd5KLZb65YWHqAR4dKEncmdvVIbtS
8s9OgluSL6eXL364gXWW0DPs7saJdd8qclOfNI21Z4wr0PMVk9pyxSEvewIDAQAB
MA0GCSqGSIb3DQEBCwUAA4IBAQBnfhceUSfyRPZjrDixTcilyz8eLoWGOAqIsAOQ
Ai/D6/3mGLMOrIzEfhfkx7yHzwz0RnxNSxr6zdMf2vwWv8uCqf4oii51CXV3XllD
JnXVZjxjzuQbbQUaLHESx3qGpkWDrjMCqkLxTtLyQhG4oHT+re3C5sTodofyPc0Z
FiizNUs9CrdTmjUb43BpDyIZT9CXYbq75VHY/UB/ZtKBmD0PS524CTjegQ66BvW4
rL6Rri8GYpcnFNXZXGvJYeJOMT4U8nP5Bqo0bTV7YiRdx4pqVtroFFh304N4q7gl
aDlfJubiocv/fc4BiqCt/5cPiypAmR5mSTN2x5RjLBGqLhBN
-----END CERTIFICATE----------BEGIN RSA PRIVATE KEY-----
MIIEowIBAAKCAQEAzb6QFbaa0IOpso8ZyhhWW6P2nwDnN08LTFtHvRl0y0rspz2/
PX5DSkUV+4I5Q2La21BZ8WAm28Ttr3BuUVQsnfDzPbSoFSdgZYXcJXxeuaumwwtx
pHpayvZj8zs0hyaie3diEMX7uqpGs/dL0pCTNmaI8nMoLMjqJnYlQCz/HAUC5wrQ
HflfbLy8LA6KpCJuuTrFZGaMSIhW74HCYyp+2jTc6G1NpxwBnwEqMy4RrYi5Mgn3
GCPxo2LnSq3SVIurd5KLZb65YWHqAR4dKEncmdvVIbtS8s9OgluSL6eXL364gXWW
0DPs7saJdd8qclOfNI21Z4wr0PMVk9pyxSEvewIDAQABAoIBACLk3fUAylLw8Zf6
EyqmZAcY0Nv4wD4uJsFlfc5BggB0jZxzqXqZbnorK2ZDmMin/GxTvV1lrFF7ncAy
dlNOzl5fHjHp8NPdoMi3IjYtWLduuFK+HyEBK2Le1ObMtMTzNX1xKu2jVmU7OdCN
8YsdwAnq6/EKvNaToLqzMPAocX/jv7DDGUJ1r6LWwelV+RW6fbWHV9alnOwOQoPt
4o8r3+ZCLz1YsI+qW9cUBcbos1dkKxY9CdBtdtmFhUb+/tTx9/JRb6W+XJEAgCEM
/xxsu6pKdr9+Rc1YrwgMaMvDRzDQhe6eJM+l84W7axmqm07iuAuOFSE/b8yev/4e
8izw4fECgYEA9G6y/pk9fGxGgE3PRWVqq3/VsVNfNNjOMFUpFlQ3GlA+t0hSC+TU
XpxOufOI6WmV6bj+iVbhQk5iFTmW0+UeS+jHFSr0uzyavag6UJz8EuQfozAonkT2
AXtB9/85MWLo/Eo+CoIhofM+SEKBvcyrx6e+Mn+zEKssWAo5dh9Gd8MCgYEA13so
ZSnT/7vLaWZwCt2rxqHpnmWFwDF9nBWgiyT7ea3dym4DfXMTKIomqTVK9Vzbd9Oy
CmJols2otHtaV96hSi1z9tvfy/6om1k1ms75rFf4GatBjrVMzB/HtE2uGuWsW8Ez
F9BwDU9wX9qs+jCnG0fZm0nzef3lOHZIj3qlJekCgYBbzW/Am4EyR+A6s/6Sy8JC
YyK5FNz/FiZqlLF3x21inpzPbYQTH4B7gC05PbRAJf296FMA9fZoVtQTsKtrLfQx
Al4zHw0HfX2ImbQ9Lpil57PSMHYw6ymR6N8f62VpnQJwLtoaTEGhd5/+t6vOwx4J
QID4qmlwazmeX0ixipGGzQKBgQCq10JXsqoaf9HuZwE+HDIs8gI/S06X6qUkMyFu
MIwRFQBblo290JbH9YBhd5dOoah/gKAQC6XQqo2vSn1+XUyTeyYN+pWdLvKO+FO/
wYnCUpyp/VWkx6lzzV6QXWZEfQQCW1Me9mtgojL+TGoIkrpqrrSgoikf92TdNyqg
VyTIwQKBgGtVa5aJEhau3XUWKUAQbv95QDUNfP9PLs5jHhfflxVkAxlpMc9G4pNV
6mXFSsl8fnvg3HCmSr4rpV5QHUzvdKgbPkMQ8mUEONn/7ad4Xhsxeoz0xS5a8Tub
XhV4F/ngKrnQgxp47BCdNe0vC5Z44OImPpvQBsZ5PueqW+Pr5JHO
-----END RSA PRIVATE KEY-----Using Signed and Encrypted Requests
The AuthNRequest to the IdP can be signed and encrypted with the provided certificate and sent via HTTP-Post binding to the IdP of choice.
Refer to more examples for help on the samltool webpage.
The assertion coming back from IdP can be signed and encrypted, provided that the certificate on the service provider side (Corteza) is included in the SAML metadata. Corteza supports signed message and signed and encrypted assertions. Refer to more examples for help on the samltool webpage.
-
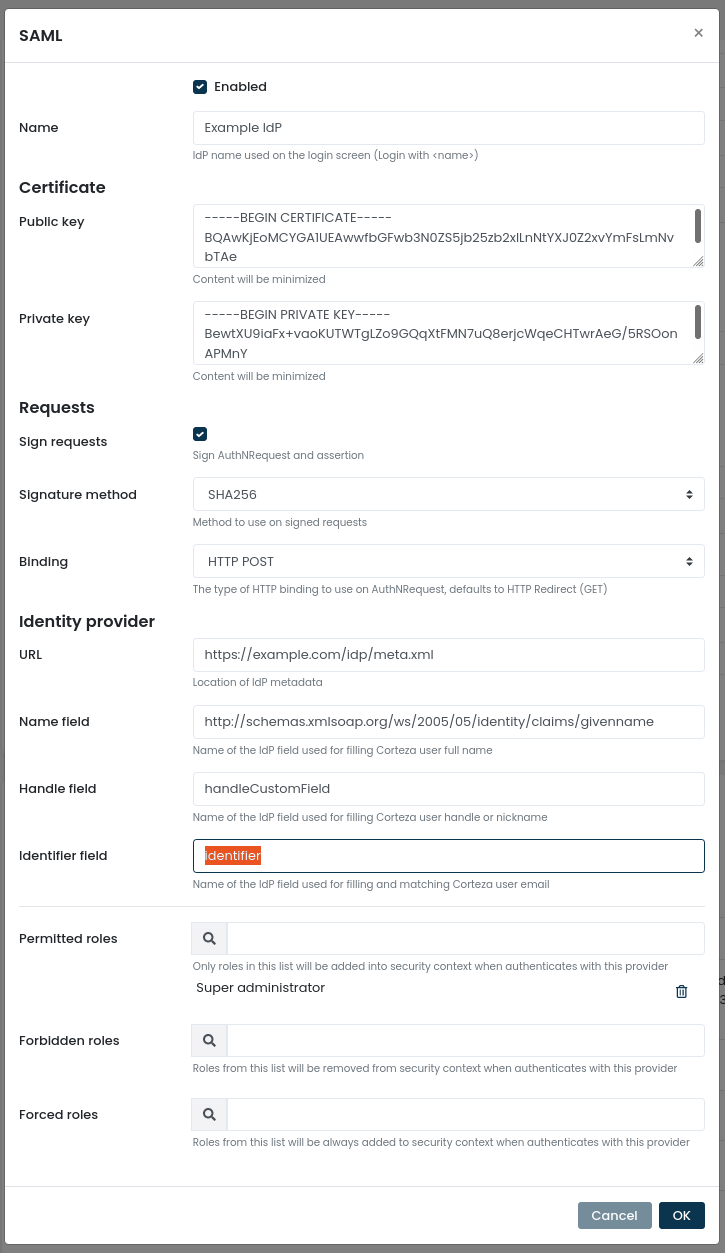
The "Sign requests" checkbox under "Certificate" section should be enabled (refer to the admin ui screenshot).
-
"Signature method" should be set and depends on the kind of algorithm was specified on the certificate creation (in this example, SHA256 was used).
For more information on AuthNRequest and assertion in metadata refer to the developer notes.
SAML Bindings
Corteza supports HTTP POST and HTTP Redirect SAML 2.0 bindings.
The "binding" dropdown should be selected, specifying either HTTP POST or HTTP Redirect binding (refer to the admin ui screenshot).
|
The fallback choice is HTTP Redirect. |
For more information on bindings in metadata refer to the developer notes.
Setting up the IdP in the Administration Panel
Open your administration panel and navigate to .
-
If you disable your SAML IdP, all settings are kept in Corteza. Users will no longer be able to use SAML for login. All active login sessions created using SAML are kept; users are not logged out.
-
The name is displayed on the login form (refer to the below screenshot).
-
Identity provider URL must point to the URL of the server which provides the metadata. The metadata is an XML document providing machine-readable instructions for SAML configuration.
-
Name, handle and identifier fields need to be specified in order for the user to be created. When a user successfully logs in using SAML, Corteza performs a lookup using a value from the identifier field, which is expected to be an email. Values from name and handle are used when creating a new user.
-
default identifier as defined in settings
-
emailAddress -
urn:oasis:names:tc:SAML:1.1:nameid-format:emailAddress -
urn:oasis:names:tc:SAML:attribute:subject-id -
email -
mail
|
The above values follow the industry standard, but you should consult your IdP-specific documentation on what is provided as a part of user data. |
Login Screen with SAML Enabled
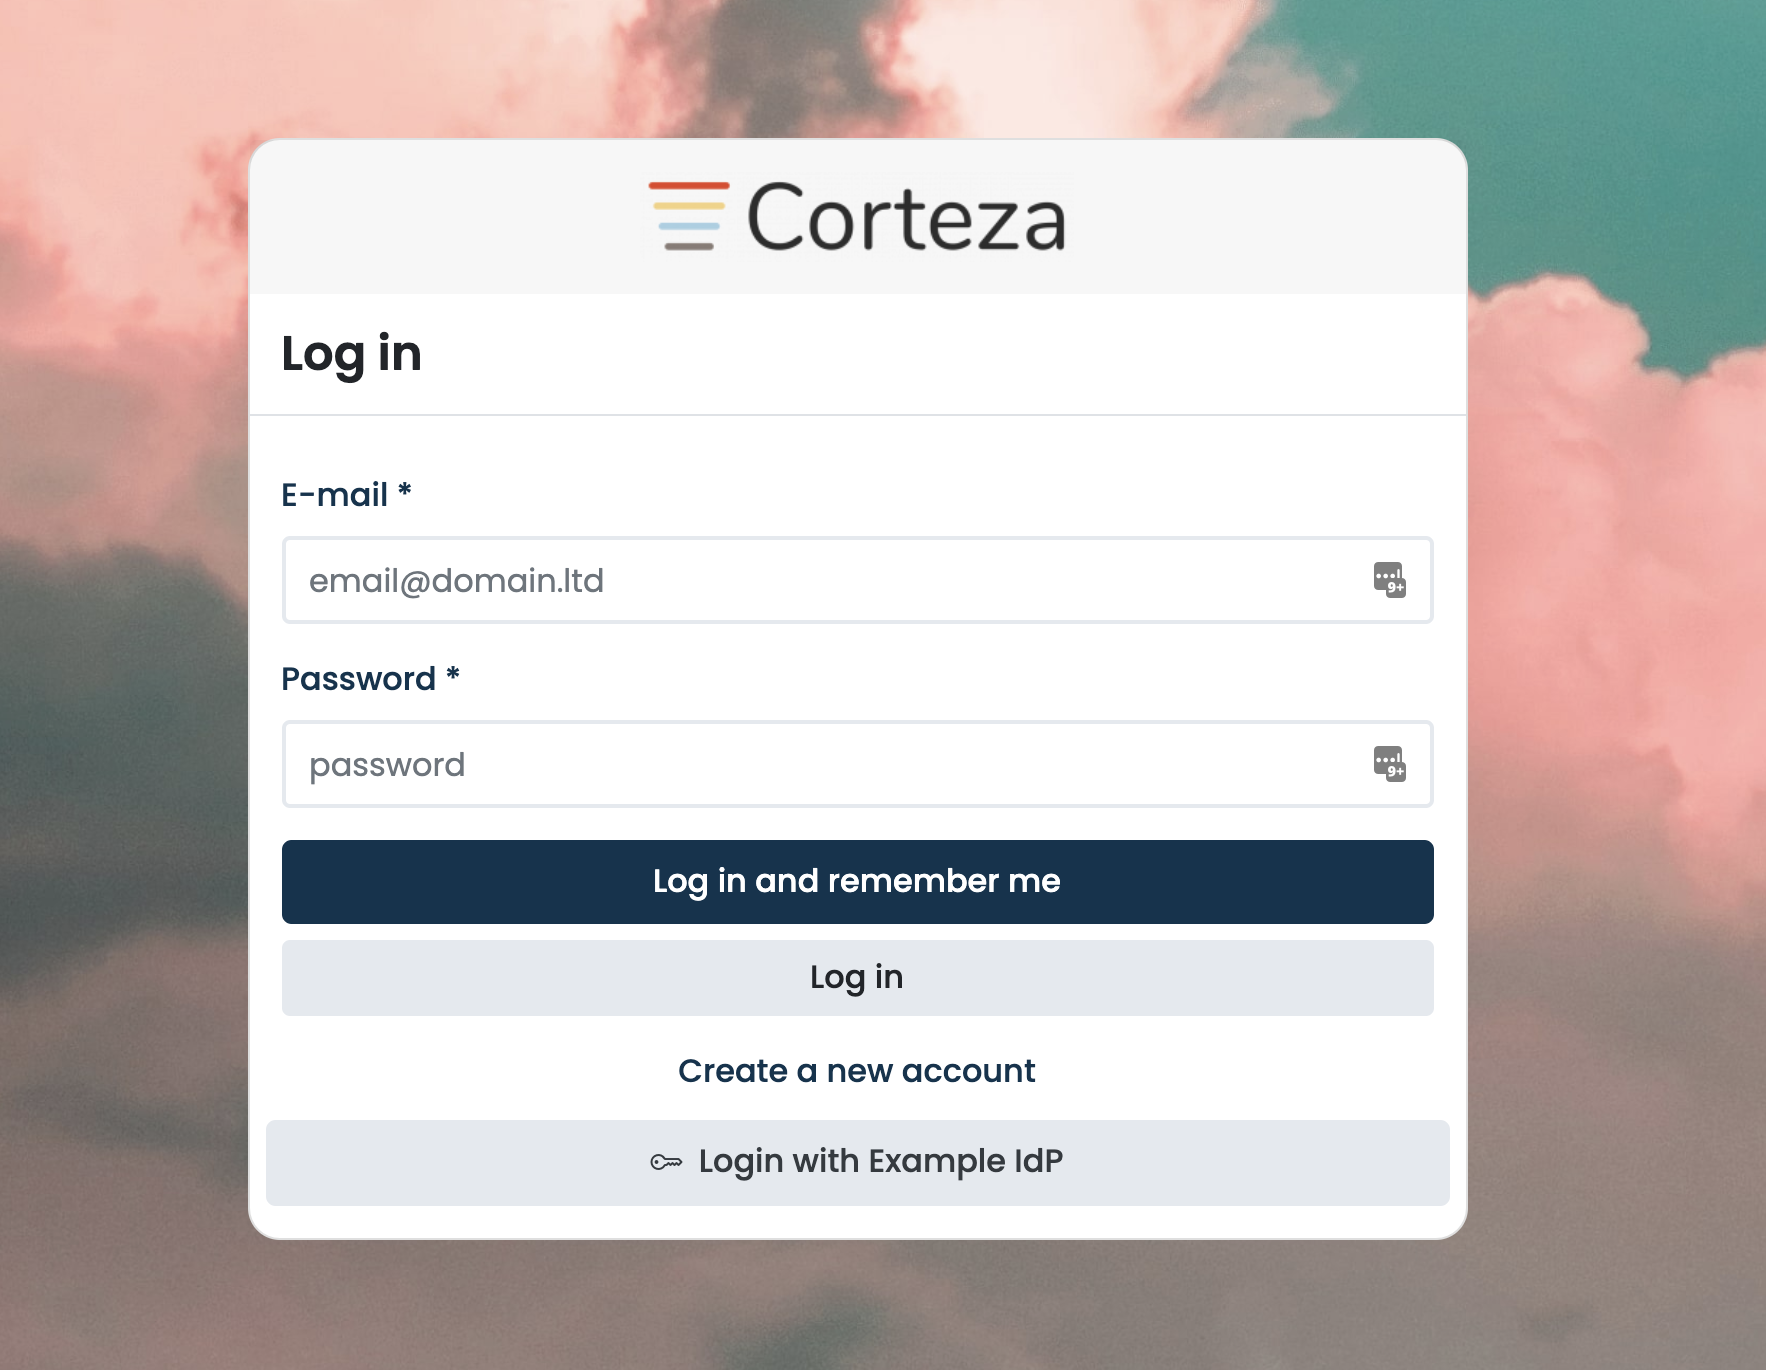
When clicking on the appropriate button (in this case, this is "Login with Example IdP"), the user enters the SAML authentication flow where the service (Corteza) and the identity providers (IdP) exchange information. The user is automatically redirected back to Corteza after successful login on the IdP.
Developer Notes
When setting up the SAML authentication provider, there is some information that can be read from the SP metadata that is generated from the configuration.
The metadata URL resides at $BASE_URL/auth/external/saml/metadata.
curl $BASE_URL/auth/external/saml/metadata |
|
|