Workflows
Corteza workflow allows you to implement custom business logic without the need for any programming knowledge. This section focuses on the most important aspects of the system. If you wish to learn more about a specific topic, refer to the subsections under .
In contrast to automation scripts, workflows are presented as a simplified BPMN diagram, allowing you to configure instead of code. You are not required to have any BPMN knowledge, although it might be helpful.
Create a new workflow
|
DevNote how to include the flow from the admin panel? |
To create a workflow, navigate to your Corteza instance (for example http://latest.cortezaproject.org/) and click ok tne "Workflows" application.

A new screen showing you all of the available workflows will appear.
-
create new workflows by clicking on the New Workflow button,
-
edit existing workflows by clicking on them,
-
manage global permissions by clicking on the Permissions button,
-
manage workflow-specific permissions by clicking on the "Lock" icon next to the workflow, or
-
import/export workflows by clicking on the Import/Export buttons.

When you click on the New Workflow button, a new screen will appear with an open modal window, where you should insert initial parameters to describe the workflow.
-
Label provides a user-friendly identifier for the workflow, for example "Test Workflow". A label doesn’t define any special constraints.
-
Handle defines a unique value that may be used instead of the system identifier for easier referencing.
-
Description defines a verbose description of the workflow in order to better explain what the workflow does.
-
Run as defines which user should be used when executing this workflow (the invoking user).
-
start with a character,
-
contain at most 64 characters,
-
contain only characters, numbers, _ (underscore), - (dash) or . (dot),
-
end with a character or a number.

About the workflow editor
The workflow editor consists of four main parts; workflow configuration screen, toolbar, canvas, and step configurator.
-
Workflow configuration (accessible by clicking on the configuration icon
 in the header) is where you provide basic workflow configurations.
 -
Toolbar is where you can find all of the available steps.
-
Canvas is where you can build and configure the workflow.
-
Step configurator is where you can configure the workflow steps.

Structure the workflow
To start building your workflow, simply drag-and-drop different elements (further referred to as steps) from the toolbar to the canvas. If you are using similar steps with similar configurations, using copy-paste to duplicate existing steps might be faster (cmd+c and cmd+v).

To define the flow of your workflow, simply connect the steps by drawing a connector between them.

To change the start point or the end point of the connector, click on the connector to view its points; then hover over the connecting point and drag it to another connector point.


Add some extra steps to get the feel for the interface. The resulting workflow doesn’t need to be valid or make any sense. All of the available steps and their configuration will be addressed in detail in the following sections.
-
Click and hold the right mouse button, drag the mouse to pan the canvas.
-
Scroll up to zoom in the canvas (inverted when natural scrolling is enabled).
-
Scroll down to zoom out the canvas (inverted when natural scrolling is enabled).
|
The remaining gestures and keyboard shortcuts can be found in the help menu. |
|
Remember, every workflow must start with a trigger |
When you’re satisfied with your workflow or wish to save your progress, click on the save button on the bottom of the screen, or use the ctrl+s shortcut.

Configuring the workflow
Without any configuration, most workflow steps don’t do anything unless we configure them to perform some task such as evaluating an expression or executing a complex function.
In order to configure specific steps, click on the configuration icon in the header of the step.
To configure a specific connector, click on its label or double click on it.
The configuration is automatically saved to the step. The workflow needs to be saved in order for the configuration to take affect.

Execution control
Execution control allows you to indicate where the workflow starts, its steps, and where the workflow ends.
Triggers
A trigger  defines when the workflow is executed and what steps the workflow execution should perform.
|
A single workflow can have multiple triggers. Multiple triggers allow you to define fewer workflows for different events. |
Every time an action occurs (e.g. a record is created or a user signed-up) the system finds all of the workflows with a trigger that conform to that operation. To exemplify; when a client signs-up for your newsletter, the system finds all of the workflows where the trigger listens to a "user signed up" event.
-
a resource which specifies what system resource the trigger reacts to,
-
an event which specifies what system events the trigger reacts to,
-
a series of constraints which specify how an event should look like in order for the trigger to react.
-
To exemplify; we can react to a Corteza created event only when the record was created for a lead module under the CRM namespace,
-
-
an initial scope which specifies what variables are available to the workflow as soon as it is executed. When working with records this is the current record, the previous version of it, the related module, the related namespace, and any record validation errors.
|
Constraint your triggers as much as possible to prevent your workflows from executing when they shouldn’t. |

Terminators
A termination step  terminates the execution of a workflow.
|
The termination step 
Figure 12. An example of a workflow with multiple terminators with a potential early termination issue.
In the example above, when any of the long running tasks finishes, the entire workflow will be terminated and the other long running task gets canceled. Refer to Parallelism for details. |
The termination step is not required, and is implied wherever the workflow is unable to continue due to the lack of steps.
|
A single workflow can have multiple termination steps. Multiple termination steps allow you to explicitly terminate the execution of a workflow. |

Expressions
An expression step  defines a set of expressions which allow you to directly interact with values defined in your workflow.
Think of this as defining an equation in spreadsheets.
defines a set of expressions which allow you to directly interact with values defined in your workflow.
Think of this as defining an equation in spreadsheets.
A single expression step can define multiple expressions, allowing you to aggregate similar operations under a single step; this reduces the size and increases readability. Refer to Expressions for more details regarding expression definition.
-
generate a full name for a contact,
-
calculate the grand total for a quote,
-
copy values from one record to another.
To configure the expression step, click on the configuration icon in the header of the expression step.

To add a new expression to the expression step, click on the + Add Expression button. Click on the expression to collapse or collapse the expression editing interface.

Functions
A function step  defines what operation should be performed when the function step is executed.
Think of this as defining a macro in spreadsheets.
defines what operation should be performed when the function step is executed.
Think of this as defining a macro in spreadsheets.
|
If you’re using logging functions, make sure to correctly set your environment variables. Refer to the DevOps guide for details. |
-
create a new quote for an account,
-
send an email notification to your mailing list,
-
delete a suspended user.
|
Functions that are not natively supported by workflows can be implemented with automation scripts. An automation script can be executed from a workflow. |
To configure the function step, click on the configuration icon in the header of the function step.

Select what function you wish to perform in the dropdown select box under the "type" section.

When you select a function, the list of function arguments appears.
An argument defines what piece of data the function should use to perform some operation.
To exemplify; the message parameter in the "log debug message" function defines the message displayed in the debug log.

The function step in the above example creates a log entry based on the provided message and fields arguments.
-
Constant values which are passed into function in their present condition. Use constant values when the passed data should not change.
-
Expressions are evaluated and the result is passed into function. This is useful when you wish to change the input without the need for an additional expression step.
Processing multiple items
When you wish to process multiple items, such as a list of leads that were created in the past month, you should use an iterator  .
An iterator allows you to sequentially process a series of items one after another.
.
An iterator allows you to sequentially process a series of items one after another.
An iterator consists of two main parts; the configuration and the iterator body.
Iterator configuration
To access the iterator configuration, click on the configuration icon in the header.
The configuration consists of three parts; type, arguments, and result parts.
From the end-user’s perspective, the iterator type specifies what arguments you need to provide in order to process the requested set of items. We characterise three main kinds of iterators:
|
|||||
Iterator arguments allow you to specify the data that the iterator is allowed to work with. Iterator arguments can be passed in two different ways:
|
|||||
During the execution of an iterator a set of results for each iteration is generated. The results depend on the iterator type. |
Iterator body
The iterator body is implied by the first outgoing connector. The second connector indicates where the execution continues after the iterator executes.
|
Note the "body" and the "end" labels on the outgoing connectors. |
Use the iterator body to define what should happen to the items in processing, for example; if our intent is to send out email notifications, this is where you do that.
The iterator body is implicitly terminated by the continue  step if neither of the iterator execution control steps are used prior.
|
Use either the continue or break steps to terminate the loop body. The advised approach is less prone to errors such as infinite loops. Do not create a loop using connectors. 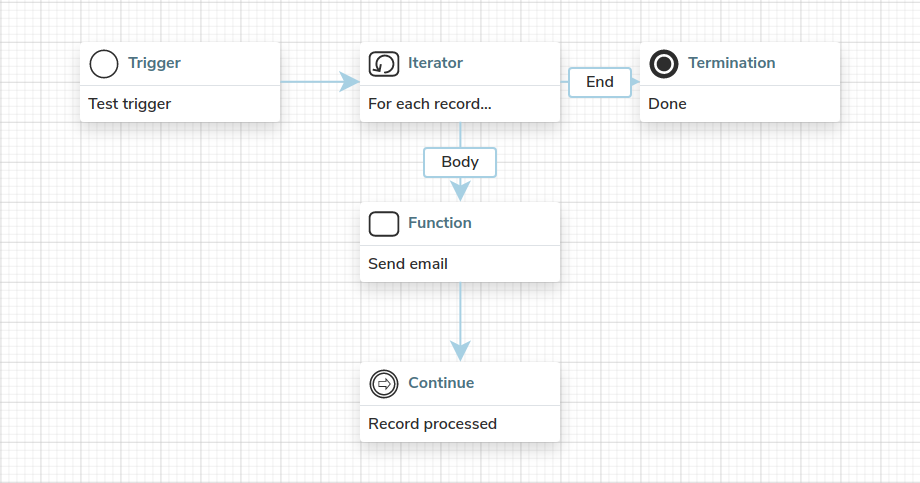
Figure 19. An example of a valid iterator body.
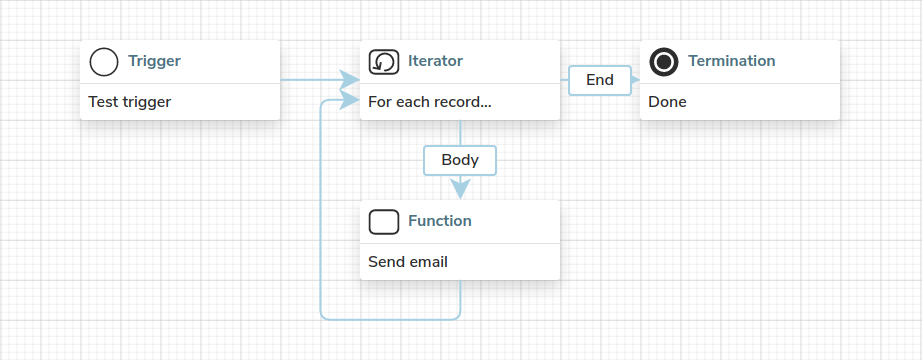
Figure 20. An example of an invalid iterator body.
|
Controlling iterator execution
There may be cases where you would like to prematurely terminate the ongoing iteration or the entire iterator all together.
This can be done using the break  or the continue steps.
|
The break and the continue steps are only valid within iterator bodies. |
The continue step 
Figure 21. An example of a premature and a complete iterator body.
|
|
The break step 
Figure 22. An example of a prematurely terminating the iterator.
|
Error handling
Whenever you work with dynamic data (especially end-user input) and external services, you are always reminded that errors can and will occur.
We define two steps for working with errors; error handler step  and error step
  .
.
Error handler
An error handler step allows you to catch and react to any errors that may occur in continuation of the workflow.
|
Think of this as a try-catch. |

The steps in the red zone can be considered as dangerous (can fail). If any step in the "dangerous" zone fails, the execution continues along the "Catch" connected steps.
Error
An error step allows you to manually trigger an error during the execution of a workflow.
Forcefully terminating the workflow using an error step prevents additional operations from executing (such as the record is not saved or a user is not suspended).
|
Think of the error step as raising an error or an exception. |

Gateways
Gateways allow you to implement conditional execution based on the ongoing state of your workflow, for example, if a current user is already a subscriber, we should send a renewal request instead of a subscription request.
There are three kinds of gateway steps; exclusive  , inclusive
  , and fork
  .
.
|
The break and the continue steps are not supported for gateways. If the gateway is nested within an iterator, the iterator will be affected instead. |
An exclusive gateway 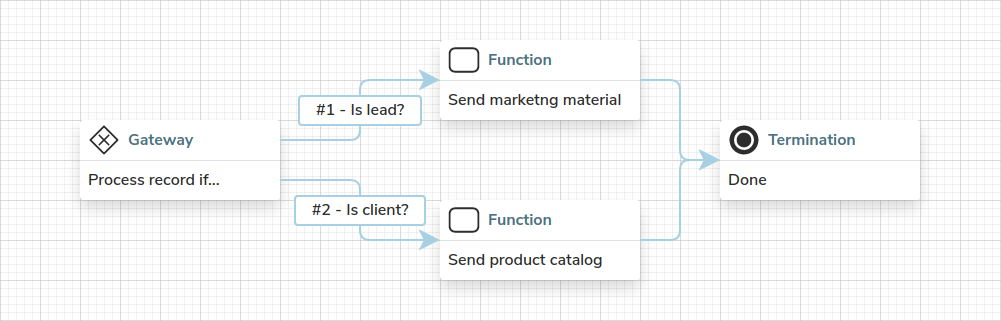
Figure 25. An example of an exclusive gateway in action.
|
|||
An inclusive gateway inclusive 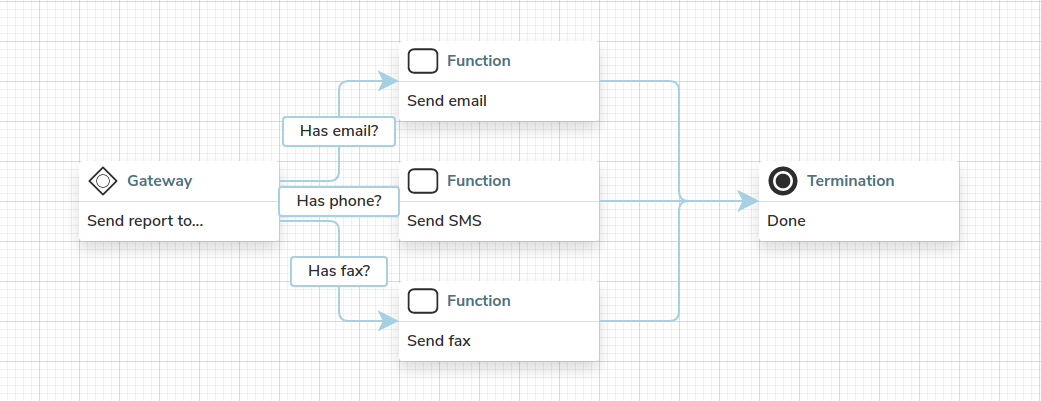
Figure 26. An example of an inclusive gateway in action.
|
|||
A fork gateway
|
Important notes
When using inclusive gateways with join gateways, the workflow may run indefinitely. The join step waits for all of the inbound paths to resolve. If any one of the inclusive paths does not resolve, the join gateway never resolves, and the workflow runs indefinitely.
You can resolve this by reworking your workflow logic to avoid such cases. 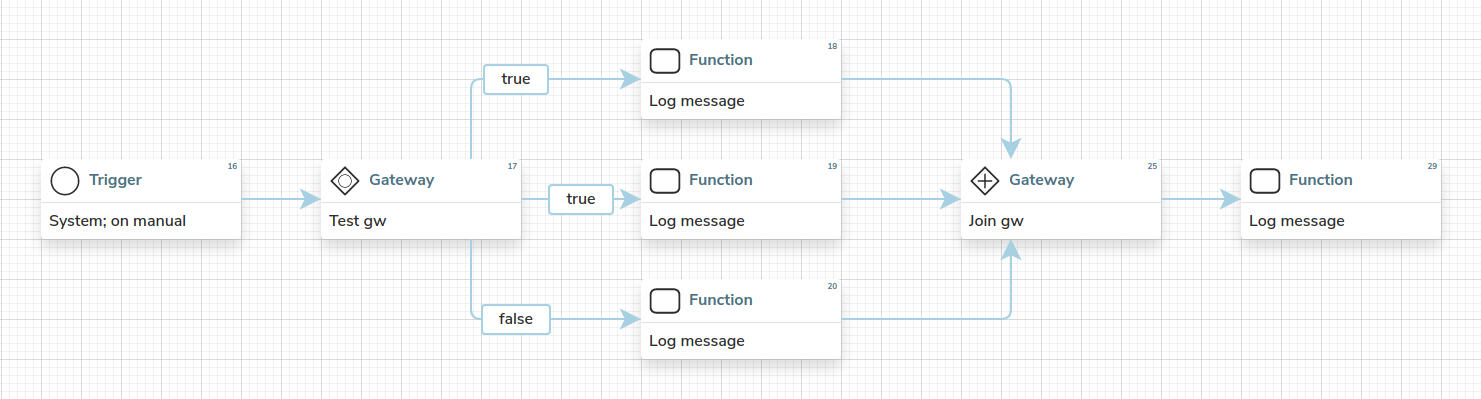
Figure 27. An example of a workflow that will never resolve.
|
Interacting with the user
|
Any workflow that uses a prompt step |
The prompt step  allows you to interact with the user in order to provide additional confirmation or data, such as a recipient email address or filling in any missing parameters.
An external redirect redirects the receiving user to the specified URL anywhere on the internet.
|
|||
An internal redirect prompt redirects the receiving user to the specified route on the current web application.
Refer to the |
|||
A record page redirect prompt redirects the receiving user to the specified record page. This can be used to redirect the user to the newly created record. |
|||
A notification prompt displays a notification to the receiving user but is dismissed immediately when shown. This can be used to show success or other informative notifications. |
|||
An alert prompt displays a notification to the receiving user. This can be used to show success or other informative notifications. |
|||
A choice prompt displays a notification with two buttons to either confirm or reject something to the receiving user. This can be used to request additional confirmation before performing an operation or to optionally perform additional operations. |
|||
A single input prompt displays a notification with a value input box to the receiving user. This can be used to request additional information from the receiving user, such as missing contact data or their pin code. |
|||
An option select prompt displays a notification with a list of available options either as a select or a list of radio buttons. This can be used as a more verbose choice prompt or a more constrained input prompt. |
|||
A record select prompt displays a notification with a record list search box from where the selected record is passed into the workflow. This can be used to allow users to select some record relevant to workflow execution. |
Delay and schedule workflows
Corteza workflow allows you to schedule or delay its execution. This can be a powerful tool when working with external services that throttle their API usage or when a task should be performed in an interval, for example monthly subscription renewal.
To achieve this, you are provided with a delay step  and a deferred trigger .
The delay of execution
The delay step allows you to explicitly pause the workflow’s execution for a set period of time.
This type of delaying is common when working with APIs that throttle their access. To exemplify; let’s say that the API allows 10 calls per minute and we wish to fetch 100 items. A possible execution is as it follows:

|
In case you wish to wait for an action performed by a user (such as a confirmation), use a prompt step instead. |
Execution scheduling
Execution scheduling is performed by configuring the trigger to run in an interval or at a specific timestamp.
An interval trigger allows you to run the workflow in a specified interval. This can be used to perform routine daily tasks or process larger data in batches. A good example is a subscription service where it is necessary to renew the subscriptions of the clients on a monthly basis. We define an interval that executes the workflow each day, determine what clients need to be renewed that day and renew them. 
To define an interval trigger, click on the click on the configuration icon The interval is defined as a chron expression and can be extremely flexible. You can also use this amazing tool to verify that your expressions are valid. Common cron examples:
|
|||||
A timestamped trigger allows you to run the workflow at a specified time. To illustrate; you have just received a new client that requested a series of deadlines where they would like to see the current progress. We could define a scheduled workflow that is executed at each one of the timestamps. The workflow would aggregate all of the completed tickets into an email and send it off to the client. 
Timestamps are defined in the ISO 8601,
|
Ready for more?
-
the style guide and best practices,
-
an introduction into our testing and debugging facility,
-
how to execute automation scripts available in the Corredor server,
-
how to process requests via Integration gateway.