Personalize Authentication Screens
All authentication interfaces used by Corteza can be fully modified and styled for your needs. Personalization is performed by defining a series of templates and assets (e.g. images and JavaScript code). This allows you to make the authentication screen match the company style guide.
Setup
Enabling Personalization
To enable the personalization of the authentication interfaces, you must set the following variables in your .env file:
| Variable | Description |
|---|---|
The |
|
The |
|
The path for the |
Export Current Assets
To export the current authentication assets, run the auth assets export command.
|
Alternatively, you can download the assets from here. |
Exports embedded assets into the provided path (must exists)

Usage:
  corteza-server auth assets export [flags]

Flags:
  -h, --help   help for export
To exemplify; assuming that we will use the /opt/deploy/corteza/auth-assets directory, run:
corteza-server auth assets export /opt/deploy/corteza/auth-assets|
If you’ve already defined the |
The produced output looks like this:
exporting auth assets to public
directory created
exporting asset /opt/deploy/corteza/auth-assets/public/background.jpeg: ok
exporting asset /opt/deploy/corteza/auth-assets/public/logo.png: ok
exporting asset /opt/deploy/corteza/auth-assets/public/script.js: ok
exporting asset /opt/deploy/corteza/auth-assets/public/style.css: ok
exporting auth assets to templates
directory created
exporting asset /opt/deploy/corteza/auth-assets/templates/authorized-clients.html.tpl: ok
exporting asset /opt/deploy/corteza/auth-assets/templates/change-password.html.tpl: ok
exporting asset /opt/deploy/corteza/auth-assets/templates/error-internal.html.tpl: ok
exporting asset /opt/deploy/corteza/auth-assets/templates/inc_footer.html.tpl: ok
exporting asset /opt/deploy/corteza/auth-assets/templates/inc_header.html.tpl: ok
exporting asset /opt/deploy/corteza/auth-assets/templates/inc_nav.html.tpl: ok
exporting asset /opt/deploy/corteza/auth-assets/templates/inc_toasts.html.tpl: ok
exporting asset /opt/deploy/corteza/auth-assets/templates/login.html.tpl: ok
exporting asset /opt/deploy/corteza/auth-assets/templates/logout.html.tpl: ok
exporting asset /opt/deploy/corteza/auth-assets/templates/mfa-totp-disable.html.tpl: ok
exporting asset /opt/deploy/corteza/auth-assets/templates/mfa-totp.html.tpl: ok
exporting asset /opt/deploy/corteza/auth-assets/templates/mfa.html.tpl: ok
exporting asset /opt/deploy/corteza/auth-assets/templates/oauth2-authorize-client.html.tpl: ok
exporting asset /opt/deploy/corteza/auth-assets/templates/password-reset-requested.html.tpl: ok
exporting asset /opt/deploy/corteza/auth-assets/templates/pending-email-confirmation.html.tpl: ok
exporting asset /opt/deploy/corteza/auth-assets/templates/profile.html.tpl: ok
exporting asset /opt/deploy/corteza/auth-assets/templates/request-password-reset.html.tpl: ok
exporting asset /opt/deploy/corteza/auth-assets/templates/reset-password.html.tpl: ok
exporting asset /opt/deploy/corteza/auth-assets/templates/security.html.tpl: ok
exporting asset /opt/deploy/corteza/auth-assets/templates/sessions.html.tpl: ok
exporting asset /opt/deploy/corteza/auth-assets/templates/signup.html.tpl: ok
exporting asset /opt/deploy/corteza/auth-assets/templates/template-dev.html.tpl: ok|
Rerunning the command does not overwrite the existing files. If you want a fresh start, delete the exported assets and re-export them. |
Modifying the Authentication Assets
/ public (1)
  / ...
/ templates (2)
/ ---| 1 | The /public subdirectory contains the assets you can use in your authentication screens such as images and stylesheets.
You are free to remove, add or change all of the files in the /public subdirectory.
The public files are served in the same format they are defined here in the /public subdirectory. |
| 2 | The /templates subdirectory contains the HTML templates that are used when displaying the authentication screens.
The templates are written in go’s template syntax.
The syntax is the same as with our document templates. |
|
Template files exported by the CLI command mentioned above should not be renamed. |
If you wish to define reusable components, you can define additional template files (such as the inc_header.html.tpl and the inc_footer.html.tpl).
Change Scenarios
Scenarios can be changed in the templates/scenarios.yaml while Corteza is running in development mode.
Styling
The default stylesheet is included from the Bootstrap CDN in the inc_header.html.tpl template.
You are free to change the stylesheet source.
|
The system doesn’t implement automatic style pre-processing or JavaScript transpiling. You can pre-process the assets with your own tools before using them in the authentication. |
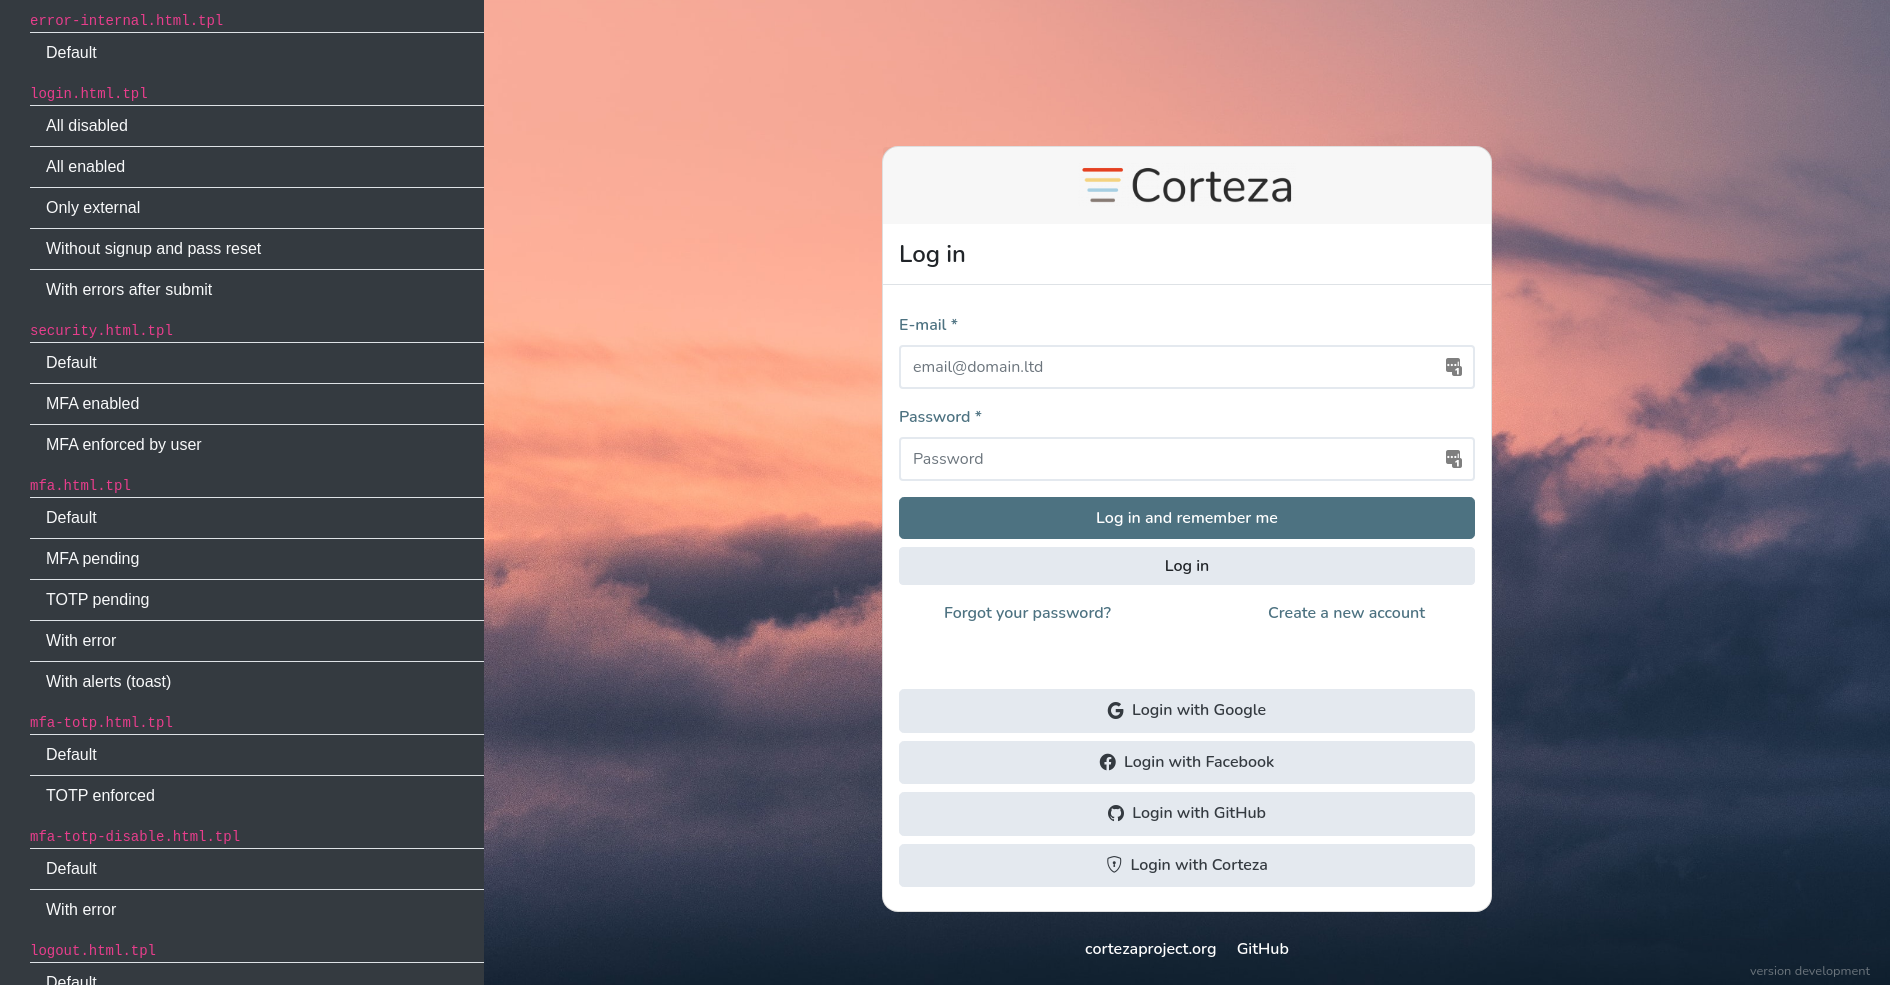
Development Tool
When you enable the AUTH_DEVELOPMENT_MODE .env variable, you gain access the development tool accessible under the $BASE_API_URL/auth/dev URL.
The development tool displays all of the templates with all of the scenarios.
Deploying the Changed Assets
Once you enable the AUTH_DEVELOPMENT_MODE .env variable, the changed assets deploy automatically.
Disable the variable after you’re done with the personalizations.
|
Do not change the |
When using docker, make sure to either mount the assets' source as a volume or rebuild a custom image on top of the default image.